
The Basics
This chapter will introduce some of the basics of using GnuCash. It is recommended that you read through this chapter, before starting to do any real work with GnuCash. Next chapters will begin to show you hands on examples.
Accounting Concepts
GnuCash is easy enough to use that you do not need to have a complete understanding of accounting principles to find it useful. However, you will find that some basic accounting knowledge will prove to be invaluable as GnuCash was designed using these principles as a template. It is highly recommended that you understand this section of the guide before proceeding.
The 5 Basic Accounts
Basic accounting rules group all finance related things into 5 fundamental types of "accounts". That is, everything that accounting deals with can be placed into one of these 5 accounts:
- Assets
-
Things you own
- Liabilities
-
Things you owe
- Equity
-
Overall net worth
- Income
-
Increases the value of your accounts
- Expenses
-
Decreases the value of your accounts
It is clear that it is possible to categorize your financial world into these 5 groups. For example, the cash in your bank account is an asset, your mortgage is a liability, your paycheck is income, and the cost of dinner last night is an expense.
The Accounting Equation
With the 5 basic accounts defined, what is the relationship between them? How does one type of account affect the others? Firstly, equity is defined by assets and liability. That is, your net worth is calculated by subtracting your liabilities from your assets:
Assets - Liabilities = Equity
Furthermore, you can increase your equity through income, and decrease equity through expenses. This makes sense of course, when you receive a paycheck you become "richer" and when you pay for dinner you become "poorer". This is expressed mathematically in what is known as the Accounting Equation:
Assets - Liabilities = Equity + (Income - Expenses)
This equation must always be balanced, a condition that can only be satisfied if you enter values to multiple accounts. For example: if you receive money in the form of income you must see an equal increase in your assets. As another example, you could have an increase in assets if you have a parallel increase in liabilities.
Figure 1. The basic accounts relationships
Double Entry
The accounting equation is the very heart of a double entry accounting system. For every change in value of one account in the Accounting Equation, there must be a balancing change in another. This concept is known as the Principle of Balance, and is of fundamental importance for understanding GnuCash and other double entry accounting systems. When you work with GnuCash, you will always be concerned with at least 2 accounts, to keep the accounting equation balanced.
Balancing changes (or transfers of money) among accounts are done by debiting one account and simultaneously crediting another. Accounting debits and credits do not mean "decrease" and "increase". Debits and credits each increase certain types of accounts and decrease others. In asset and expense accounts, debits increase the balance and credits decrease the balance. In liability, equity and income accounts, credits increase the balance and debits decrease the balance.
In traditional double-entry accounting, the left column in the register is used for debits, while the right column is used for credits. Accountants record increases in asset and expense accounts on the debit (left) side, and they record increases in liability, revenue, and equity accounts on the credit (right) side. GnuCash follows this convention in the register.
|
Note
|
This accounting terminology can be confusing to new users, which is why GnuCash allows you to use the common terms Deposit and Withdrawal. If you prefer the formal accounting terms, you can change the account register column headings to use them in the Accounts tab under Preferences (see the GnuCash Help Manual for more information on setting preferences). |
|
Warning
|
Common use of the words debit and credit does not match how accountants use these words. In common use, credit generally has positive associations; in accounting, credit means affecting the right column of the ledger sheet of an account. This is associated with a decrease in asset and expense, but an increase of income, liability and equity accounts. For more details see http://en.wikipedia.org/wiki/Debits_and_credits. |
Data Entry Concepts
When entering data in GnuCash, you should be aware of the 3 levels of organization in which GnuCash divides your data: files, accounts and transactions. These levels are presented in their order of complexity, one file contains many accounts and one account contains many transactions. This division is fundamental to understanding how to use GnuCash.
Files
GnuCash stores information at the highest level in files. A file can be stored on your computer either as a single XML file (in all versions of GnuCash), or in a SQL database (in GnuCash version 2.4 and higher).
|
Note
|
SQL is pronounced "sequel", so in spoken and written language we would say "a SQL database". |
With the XML file format, GnuCash stores your data in an XML data file, usually in compressed format (although this can be changed in the General tab of the GnuCashPreferences).
With SQL storage, GnuCash stores your data in a SQL database under the database application you select (SQLite3, MySQL or PostgreSQL).
You will need one main file or database for each set of accounts you are maintaining. To learn how to create and manage GnuCash files, see Storing your financial data.
|
Note
|
If you think you might need more than one set of accounts, you might want to consult a professional accountant or bookkeeper before proceeding. Most users will probably have only one data file. |
Backup files and log files are automatically generated by GnuCash when appropriate. Backup and log files are described in Backing Up and Recovering Data.
Accounts
An account keeps track of what you own, owe, spend or receive. Each GnuCash file can contain any number of accounts, and each account can contain many sub-accounts up to an arbitrary number of levels. This simple feature gives GnuCash much of its power in managing your finances, as you will see in later chapters.
Examples of accounts include: checking accounts, savings accounts, credit card accounts, mortgages, and loans. Each GnuCash account tracks the activity for that "real" account, and can inform you of its status.
In addition, accounts are also used to categorize the money you receive or spend. For example, you can create expense accounts to track the money you pay on utilities or groceries. Even though these are not accounts that receive statements, they allow you to determine how much money is being spent in each of these areas.
Accounts will be covered in more detail in [chapter_accts].
Transactions
A transaction represents the movement of money among accounts. Whenever you spend or receive money, or transfer money between accounts, that is a transaction.
Examples of transactions are: paying a phone bill, transferring money from savings to checking, buying a pizza, withdrawing money, and depositing a paycheck. [chapter_txns] goes more in depth on how to enter transactions.
In double entry accounting, transactions always involve at least two accounts–a source account and a destination account. GnuCash manages this by inserting a line into the transaction for every account that is affected, and recording the amounts involved in each line. A line within a transaction that records the account and amount of money involved is called a split. A transaction can contain an arbitrary number of splits.
|
Note
|
Splits in transactions will be covered in [txns-registers-multiaccount2] |
Interface
The very first time you open GnuCash, you will see the Welcome to GnuCash! screen. From there, GnuCash provides other tools to help you easily find what you are looking for. Let’s take a look at some of the common screens and screen boxes you will see.
Tip of the Day
GnuCash provides a Tip of the Day screen to give helpful hints for using the program:

Figure 2. The Tip of the Day
These tips provide useful information for beginning users. To view more of the tips, click Forward to continue. If you do not wish to see this screen box on start-up, deselect the box next to Show tips at startup. When you have finished viewing the helpful tips, click Close to close the Tip of the Day screen.
Account Tree Window
You should now see the Accounts window, which appears as shown below. The exact layout of the account tree will depend on which default accounts you selected during the New Account Hierarchy Setup. In this example, the Common Accounts are shown.
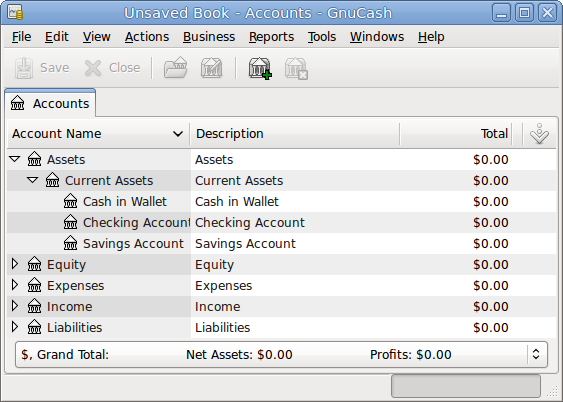
Figure 3. The Account Tree Window
The Account Tree window (also known as a Chart of Accounts, or CoA) provides an overview of the data contained in the current file. It contains a list of account names and their current balances.
From this window, you can open the register of any account either by double-clicking the account name, right clicking the account name and selecting Open Account from the menu, or by using the Open button on the toolbar. GnuCash allows you to have as many account registers open as you wish. For more information on using account registers, see Account Register Window.
|
Tip
|
Clicking the small triangle to the left of an account that has children will expand the tree view showing child accounts. |
At the top of this window is the Titlebar, which displays the file name for this set of accounts (once you have saved the file.) Below that is the Menubar. You can access the menu options by either clicking on these menu headings or by using shortcuts and access keys (see Menu Shortcuts). Next is the Toolbar, which contains buttons for the most common functions.
The account tree appears below the Toolbar. Once you have started creating accounts, the account names will appear in the account tree. You can customize which headings show up by using the small down-arrow at the far right just above the account tree.
At the bottom is the Statusbar, which tells you information about what you own (Net Assets) and how much money you have made (Profits).
Account Register Window
Account Register windows are used to enter and edit your account data. As the name suggests, they look similar to a checkbook register.
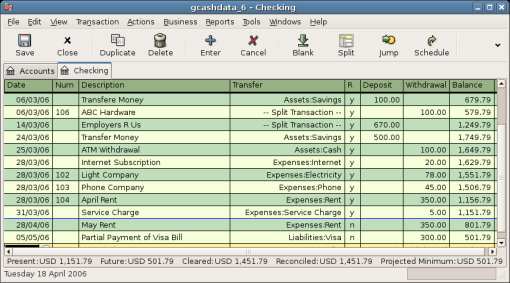
Figure 4. The Checking Account Register
[chapter_txns] explains more about account register windows and how to enter data into them. For now, note that the parts of an account register window are similar to the parts of the account tree window described earlier. The Titlebar at the top contains the account name. Below that, the Menubar contains menu options related to the account register. Toolbar buttons simplify common data entry functions. The Statusbar at the bottom of the window, displays some account balances covered in [chapter_txns]. At the bottom of the account register window, information appears about the current location of the cursor.
|
Note
|
In the register windows, you can resize the various columns that GnuCash displays, but keep in mind that the Description and Balance columns behave differently from other columns. The Description column is designed to expand automatically to fill all unused horizontal screen space. Therefore you should set the widths of all your other columns before setting the Description column width. The Balance column must be resized by double-clicking on the column heading. |
Toolbar Buttons
Both the account tree window and the account register window contain Toolbar buttons. These buttons provide quick access to common functions such as Save and Open in the account tree window and Record and Delete in the account register window. If you are not sure what a button does, move the mouse pointer over that button, and you should see a description of the function appear.
Here is a summary of the account tree window buttons:
- Save
-
Save the current file to disk
- Close
-
Close the current notebook page
Open, Edit, New and Delete:: These are functions related to accounts. They are discussed in [chapter_accts].
Register-specific buttons are discussed in [chapter_txns].
Tab Bar
GnuCash uses a tabbed model that allows you to open multiple account registers and reports simultaneously. Each open window (which can include account registers, reports, or Scheduled Transactions windows) is given a tab on this bar that you can click to view that window. Tabs can be configured in Preferences to appear along any side of the GnuCash window.
To see the full name for a tab, hover the mouse pointer over an account window tab.
If more screens are open than can be displayed across the screen, some tabs will not display. You can move through all tabs by clicking the arrows on either end of the tab bar. A complete list of tabs can be viewed by right-clicking the Tab Bar and any tab can be selected by clicking it.
Menu Items
The account tree window and the account register window both contain menu headings in a Menubar. Clicking on a menu heading brings up the menu items for that heading.
You can click on the account tree menu headings and then move the mouse pointer over the menu items to see what they do. As the pointer moves over a menu item, a description of the item appears in the lower left-hand corner of the window (inside the Statusbar). To select a menu item, click on it.
You can also access the most common menu items in a window by right-clicking the mouse anywhere in that window. In the account tree window, this will bring up a list of account items. In the account register window, this will bring up a list of transaction items.
Other ways of accessing menu items are through keyboard shortcuts and access keys, described next.
Menu Shortcuts
All of the menu items have access keys which are marked by underlined characters in the menu names. Pressing the Alt key with the underlined character in the menu heading will bring up the menu items for that heading. Once the menu items are displayed, type the underlined character in the menu item to activate it. For example, typing AltF in the main window brings up the menu, then typing S will save the file. Access keys are fixed and cannot be changed by users.
Some of the more commonly used menu items also have shortcut keys that directly activate the command without having to traverse the menu structure. These shortcuts typically use the Ctrl key, although they can use any key combination. Menu shortcuts are displayed at the end of each menu item.
Getting Help
GnuCash offers help in many ways. We have already covered the Tip of the Day screen that gives you helpful hints upon start-up of your GnuCash session. GnuCash also offers an extensive help manual.
Help Manual
Once you have opened GnuCash, you will see the Account Tree window Help menu heading, which opens the Help manual. The Help manual is organized by topic, and you can expand each topic into its subtopics.
Topics are listed on the left side. To select a topic or subtopic, click on it, and you should see the text for that topic appear on the right. Use the Back and Forward buttons to navigate through your topic choices, and print any text using the Print button.
Web Access
The GnuCash Help window also acts as a simple web browser, so you can pull up a web site for additional information. You can open any web site under this window by clicking the OpenToolbar button and then typing in the URL. Use the Back, Forward, Reload, Stop, and Print buttons as you would in a standard browser.
The GnuCash web site contains helpful information about the program and about any updates to it. It also contains links to the GnuCash mailing lists for developers and users, and you can search the archives of GnuCash mailing lists for discussions on a particular topic. If you don’t find the answers you are looking for, you can post your question to the GnuCash user list, and someone on the list will attempt to answer you.
The most updated GnuCash FAQ is also located on the GnuCash FAQ website, and contains answers to the popular questions.
Topic Search
The online manual also provides a search function. To search for a particular topic, click the Search tab at the bottom of the help window and type in your topic in the field provided. Click the Search button to complete your search. A list of choices should appear in the box below, clicking a choice will bring up its text on the right.
Storing your financial data
GnuCash is able to store your financial data in files or SQL databases so that they can be opened and modified at a later time. But first you need to create a container for your data.
Creating a file
To create a new GnuCash file do the following:
-
From the GnuCashMenubar, choose menu:File[New File]. The New Account Hierarchy setup assistant will start.
NoteIf you are running GnuCash for the first time, you will be presented with the Welcome to GnuCash! screen. This screen is described in detail in the GnuCash manual.
-
Set your preferences in the assistant and move through the screens with the Forward, Cancel and Previous buttons.
Saving data
Follow these steps to save the file under your preferred name:
-
Choose menu:File[Save As…] from the Menubar or select the SaveToolbar button. GnuCash will bring up the save window.
-
Select the Data Format of the file you are saving from the drop down list. The default selection is XML but if you have set up a database back end you can change to that format.
Depending on the selected Data Format the window can change as described in the following.
-
-
If you selected XML or sqlite3 you will see a screen like this:
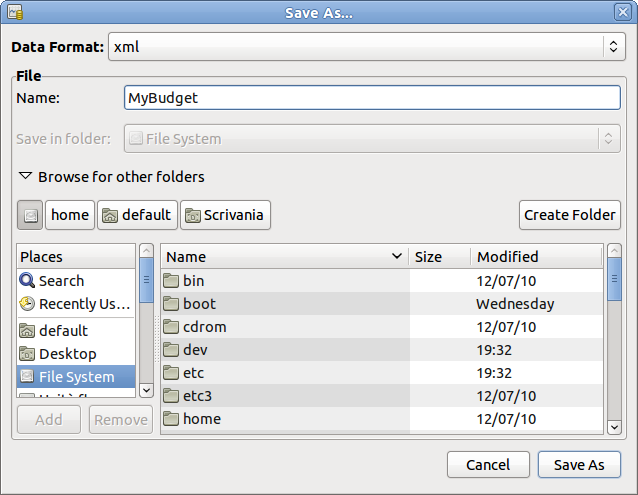 Figure 5. The Save screen
Type your chosen filename in the Name field. It is not necessary to specify an extension when you write the file name. GnuCash will automatically add the extension .gnucash to the file.
NoteThe .gnucash extension was introduced in the 2.3 series of GnuCash. For already existing files, the extension will never be changed. So if you open an existing file named Myoldfile, that name won’t be changed if the file is saved. You might use the Save As… > command and give the file a new name in order to have it saved with the extension .gnucash.
Select the path where the file will be saved by browsing the tree in the lower panes.
TipClick on the Create Folder button to create a new folder with a custom name in the selected path.
-
If you selected mysql or postgresData Format you will see a screen like this:
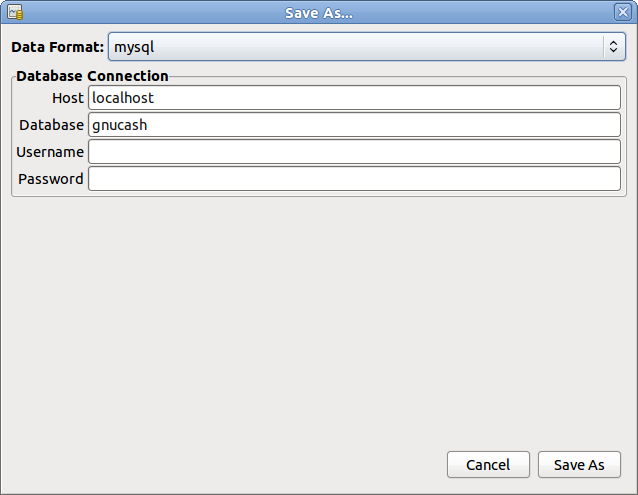 Figure 6. The Save screen
Enter in this window the Database Connection information: Host, Database, Username and Password.
+
WarningSaving to mysql or postgres requires the proper permissions in that database, that is you need to have the permissions to create a new database with the given database name, or you need to have write access to an existing database with the given database name.
-
-
Click the Save As button to save the file.
If you are keeping track of finances for a single household, you need only one file. But if you are also tracking business finances or want to keep data separate for some reason, then you will need more than one file.
Before ending each GnuCash session, be sure to save your data changes using menu:File[Save] or the SaveToolbar button.
|
Note
|
As it is very important to save your data frequently to avoid losing them for whatever reason, GnuCash is able to automatically save the opened file every a certain amount of time. This interval can be set in the General tab under menu:Edit[Preferences] (menu:GnuCash[Preferences] on Mac OS X). Keep in mind that this option is relevant only if you are saving in XML format. If you are working with a database, the Save button and the Save menu entry will be grayed out because changes are stored right away. |
Opening data
To open an existing file or database, select menu:File[Open] from the menu. In the window that will open, select the Data Format. If you selected File choose the file you want to open by browsing the folders in the lower panes. Else, enter the required Database Connection information.
|
Tip
|
GnuCash keeps a list of the recently opened files. Open the File menu and you will see listed the names of recently opened files. Click on the one you want to load to open it. |
Duplicating an Account Hierarchy
In some cases, it might be useful to duplicate the structure of an existing data file in a new file. For example, you might want to try out new accounting techniques without corrupting your actual accounting data, or you might need to follow accounting guidelines that require you to close your books at the end of the year and begin each year with a fresh set of books.
GnuCash allows you to create an empty copy of your Chart of Accounts simply by selecting menu:File[Export > Export Accounts]. When you select this command, you are asked to provide the name for the new empty file, and GnuCash creates a new data file that contains only your account hierarchy (that is, there is no transaction data). Once saved, the new file can be opened like any other GnuCash data file as described above.
Backing Up and Recovering Data
GnuCash creates several types of files to help ensure that your data is not lost. If you look in the folder where your saved file resides, you may see other files generated by GnuCash with the following extensions: .gnucash, .log, .LCK, .LNK in the same directory as your primary data file. What each of these files does is presented below.
|
Note
|
The following sections are relevant only if you are saving your financial data in the XML format |
      $ ls
      myfile.gnucash
      myfile.gnucash.20100414185747.gnucash
      myfile.gnucash.20100414223248.log
      myfile.gnucash.20100415114340.gnucash
      myfile.gnucash.20100415154508.log
      myfile.gnucash.20100415173322.gnucash
      myfile.gnucash.20100415194251.log
      myfile.gnucash.7f0982.12093.LNK
      myfile.gnucash.LCK
Backup file (.gnucash)
Each time you save your data file, a backup copy will also be saved with the extension .YYYYMMDDHHMMSS.gnucash. This backup file is a complete copy of your previous data file, and the filename format refers to the data file, year, month, day and time of the backup. For example, the filename myfile.gnucash.20100414185747.gnucash indicates this is a backup copy of the file myfile saved in the year 2010, April 14, at 6:57:47 p.m.
To restore an old backup file, simply open the .YYYYMMDDHHMMSS.gnucash file with the date to which you wish to return. Be sure to save this file under a different name.
|
Note
|
.YYYYMMDDHHMMSS.xac instead of the actual extension .YYYYMMDDHHMMSS.gnucash. So if you upgrade from the 2.2 series to the 2.4 series, you may end up with both .YYYYMMDDHHMMSS.xac and .YYYYMMDDHHMMSS.gnucash backup files in your directory. |
Log file (.log)
Each time you open and edit a file in GnuCash, GnuCash creates a log file of changes you have made to your data file. The log file uses a similar naming format as the backup files: .YYYYMMDDHHMMSS.log. Log files are not a full backup of your data file - they simply record changes you have made to the data file in the current GnuCash session.
In case you exit GnuCash inadvertently, possibly due to a power outage or a system wide crash, it is possible to recover most of your work since the last time you saved your GnuCash file using this log file. This is the procedure:
-
Open the last saved GnuCash file.
-
Go to menu:File[Import > Replay GnuCash .log file] and select the one .log file with the same date as the saved file you just opened. Make sure that you picked the right .log file, or you will possibly wreak havoc in your accounts.
Log replaying will recover any transaction affecting the balance entered since the last save, including those created from scheduled transactions and business features (invoices, bills, etc.).
|
Warning
|
Changes to the scheduled transactions, invoices or bills themselves are NOT recovered, and their transactions that were recovered may not be properly associated with them, and should thus be double-checked. Especially for business transactions, you may have to delete and re-create some of them. If you do not, although the balance will be correct, some reports may not. |
Lock files (.LNK and .LCK)
You may occasionally see .LNK and .LCK files appear. These do not store any data, but they are created to prevent more than one user from opening the same file at the same time. These files are automatically created when you open the file, to lock it so no one else can access it. When you close your GnuCash session or open another file, GnuCash unlocks the first data file by deleting the .LCK and .LNK files.
If GnuCash crashes while you have a data file open, the .LCK and .LNK files are not deleted. The next time you try to open GnuCash, you will get a warning message that the file is locked. The warning message appears because the .LNK and .LCK files are still in your directory. It is safe to choose Yes to open the file, but you should delete the .LNK and .LCK files (using a terminal window or your file manager). Once those files are deleted, you will not get the warning message again unless GnuCash crashes.
File Management
So which files should you keep around? Keep your main data file, of course. It’s a good idea to keep some of the more recent .YYYYMMDDHHMMSS.gnucash backup files, but you can safely delete the .log files since they are not complete copies of your data.
|
Note
|
If you upgraded from a GnuCash version prior to 2.4, you may also have backup files in the old .xac format. For these files you can apply the same principle described above for .YYYYMMDDHHMMSS.gnucash backup files. |
You should also delete any .LCK and .LNK files that you see after closing GnuCash. If you decide to back up your data file to another disk manually, it’s enough to back up the main data file - not the .YYYYMMDDHHMMSS.gnucash backup files.
|
Note
|
By default GnuCash will automatically delete any .log and .YYYYMMDDHHMMSS.gnucash backup files that are older than 30 days. You can change this behavior in the GnuCash preferences in the General tab under menu:Edit[Preferences] (menu:GnuCash[Preferences] on Mac OS X). |
Migrating GnuCash data
Sometimes you may need to move your financial data and GnuCash settings to another machine. Typical use cases are when you buy a new computer or if you want to use the same settings over two different operating systems in a dual boot configuration.
Migrating financial data
Migrating GnuCash financial data is a as simple as copying .gnucash files with a file manager if you know where they are saved. If you can’t remember where a file is stored but you can open it directly within GnuCash, save it in the desired path from within GnuCash.
All other files in the folder are either backups or log files. It won’t do any harm to copy them too, but it’s not likely to do any good, either.
Migrating preferences data
Preferences are stored in three different locations: one for GnuCash preferences, one for reports, and one for online banking settings. Preferences are managed by gsettings, reports are managed by GnuCash itself, and online banking is managed by aqbanking. If you do not use online banking, then you will not have this folder on your machine.
Where the GnuCash preferences are stored varies depending on your operating system (see Application Settings Locations, Saved Reports Locations, and Online Banking Settings Locations). To back up and transfer your entire installation, you must copy these preferences as well.
| Operating system | folder |
|---|---|
Unix |
GnuCash preferences are stored in dconf. You can use the commands dconf dump /org/gnucash/ on the old machine and dconf load /org/gnucash/ on the new machine to migrate your preferences. |
Mac OSX |
~/Library/Preferences/gnucash.plist |
Windows |
The preferences are stored in the Windows registryHKEY_CURRENT_USER/software/GSettings |
| Operating system | folder |
|---|---|
Unix |
~/.gnucash |
Mac OSX |
~/Library/Application Support/gnucash |
Windows |
Documents and Settings/Username/.gnucash or Users/Username/.gnucash |
| Operating system | folder |
|---|---|
Unix |
~/.aqbanking |
Mac OSX |
~/.aqbanking |
Windows |
Documents and Settings/Username/.aqbanking |
|
Note
|
On Unix and Mac OSX, these folders will generally not display in the file manager. You must set the file manager to show hidden files and folders to see them. |
|
Tip
|
On Unix and Mac OSX, the ~ symbol means the home folder. |
Putting It All Together
|
Note
|
This section begins a tutorial that will continue throughout this book. At the end of each chapter, you will see a Putting It All Together section that walks you through examples to illustrate concepts discussed in that section. Each Putting It All Together section builds on the previous one, so be sure to save your file for easy access. |
Let’s get started!
-
First, let’s create a file to store your real data. Open GnuCash and select menu:File[New File] from the Menubar. This will start the New Account Hierarchy Setup assistant that allows you to create several accounts at once.
NoteIf you are running GnuCash for the first time, you will be presented with the Cannot find default values screen which is described in details in the GnuCash manual.
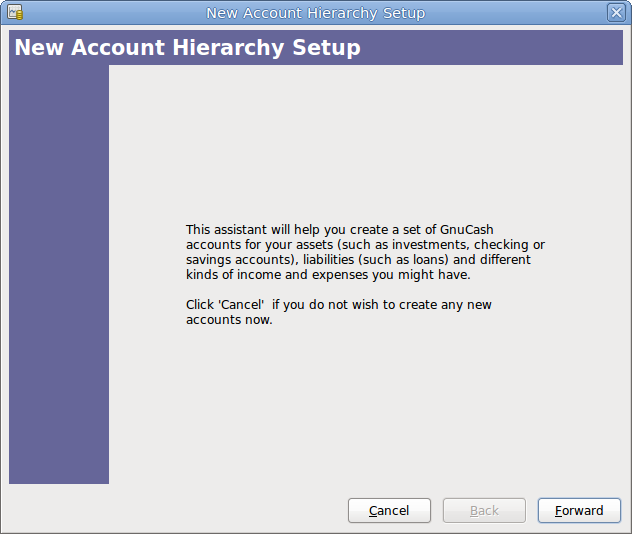 Figure 7. The New Account Hierarchy Setup assistant
The first screen of the assistant gives you a description of what the assistant does. Click the Forward button to proceed to the next screen.
-
In the second screen, select the currency to use for the new accounts from the dropdown list. Then press the Forward button.
NoteThe currency you select here, will be assigned to all the accounts created in this assistant.
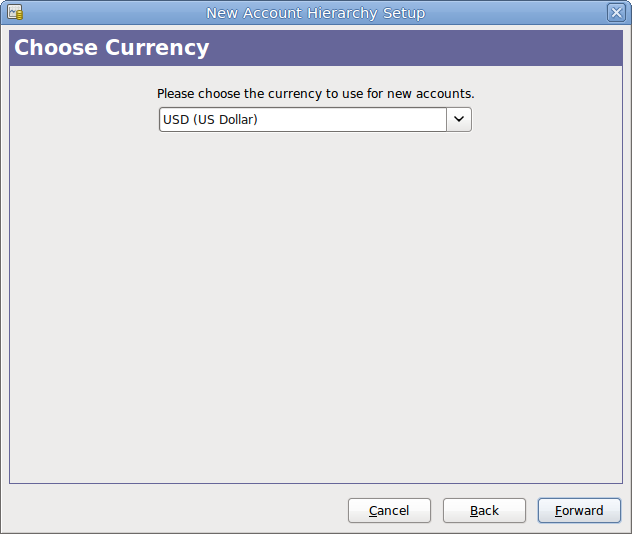 Figure 8. The New Account Hierarchy Setup assistant - Currency
 -
In the third screen, set the New Book Options, then press the Forward button. You can also update these options later using menu:File [Properties]. For details of these options, see the GnuCash Help manual, chapter Customizing GnuCash, Book Options.
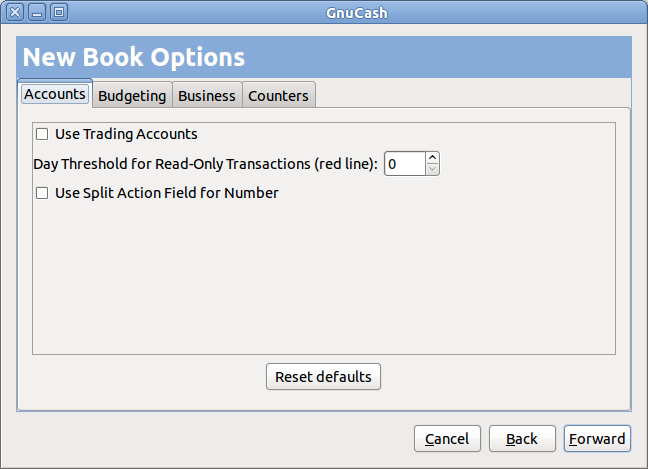 Figure 9. The New Book Options assistant
 -
In the fourth screen select the Common Accounts group in the Categories pane. Then press the Forward button to proceed.
NoteIf you want, you can select one or more of the predefined account-groups here. For more information on account types, see [accts-types1].
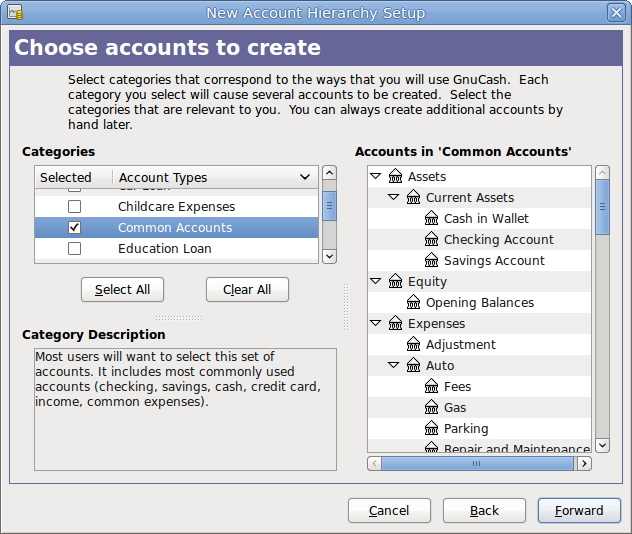 Figure 10. The New Account Hierarchy Setup assistant - Choose accounts
 -
In the fifth screen you will be able to set an Opening Balance on each of the accounts, as well as indicate if the account should be a Placeholder. As these features will be described in next chapters, leave all as configured by GnuCash and click Forward to open the last screen of the assistant.
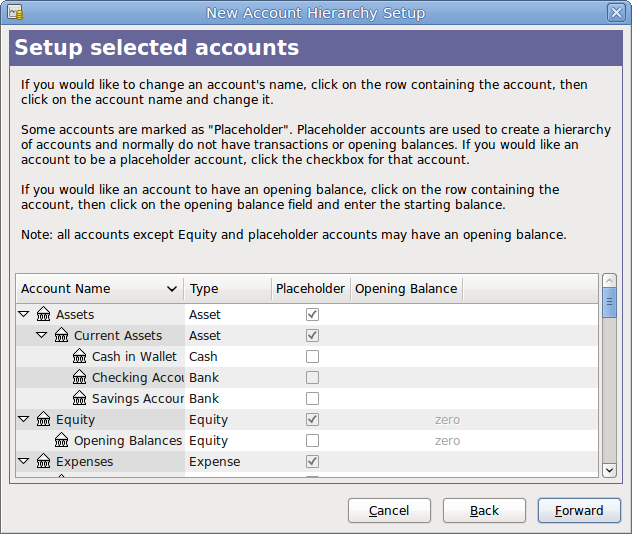 Figure 11. The New Account Hierarchy Setup assistant - Configure
 -
In the last screen of the assistant, click Apply to create all the accounts and leave the assistant.
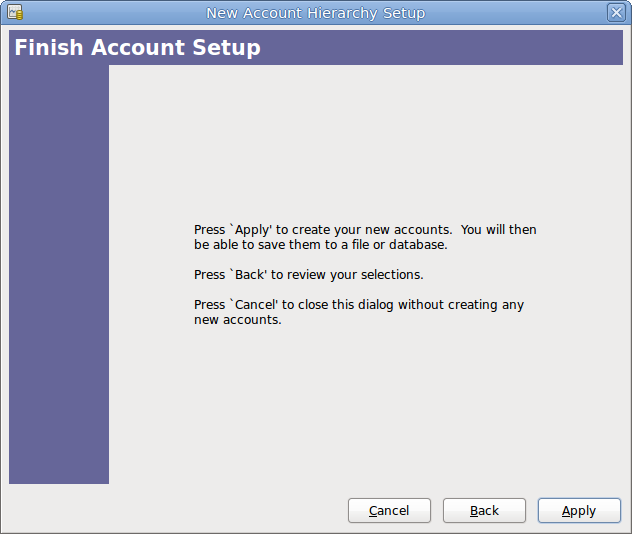 Figure 12. The New Account Hierarchy Setup assistant - Finish
 -
After pressing Apply in the previous window, you will be presented with the save dialog. Select the XMLData Format, Name the file as gcashdata_1, select the folder where to save the file (remember it as the data file will be used in the tutorials throughout this manual), and finally press the Save as button.
Your main window should now look something like this:
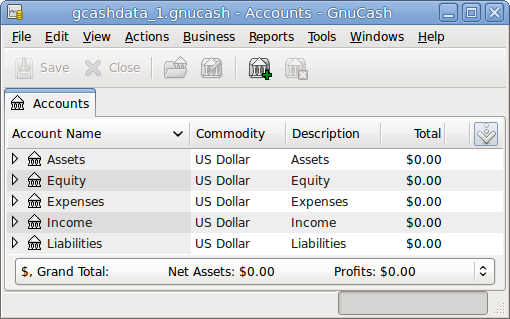 Figure 13. The Main window showing the test file